Nutella Stuffed Strawberries

Nutella Stuffed Strawberries

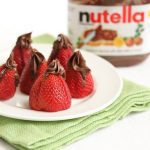
I’ve always thought that strawberries and Nutella make a great combination. So the other day I thought, why not just stuff some Nutella into strawberries? Strawberries have been on sale lately. Must be a sign.

While it’s easy to stuff the berries with Nutella, it was harder to pipe them and make them look pretty because of the Nutella’s texture. If I were to do it again for guests, I might do a Nutella whipped cream instead.

INGREDIENTS:
12-14 Strawberries
3/4 cup Nutella for stuffing

DIRECTIONS:
1. Place Nutella into piping bag and refrigerate about 30 mins so it becomes firmer for piping.
2. Slice off a tiny bit of top end of strawberry (where attached to green) so that the strawberry can stand on a flat surface. Then make a deep knife cut on tip of strawberry. You want to make two cuts for each strawberry in the shape of an “X” or a cross. You want to cut about 3/4 of the way down, but not all the way. Use your finger to help separate the petal of the strawberries so that they open up enough for stuffing.
3. Remove Nutella from fridge and pipe into each of the strawberries. (As I stated in my post, it is hard to pipe it pretty. If you want a prettier presentation, I think it’s better to do a Nutella whipped cream mixture.)

Nutella Stuffed Strawberries


34 Photos That Show The Difference Between Normal Food And Hipster Food


1. Normal spag bol:

Hipster spag bol.
1-1

2. Normal lemonade:
2

Hipster lemonade.
2-2

3. Normal sausages:
3

Hipster sausages.
3-3

4. Normal ice cream:
4

Hipster ice cream.
4-4

5. Normal beer:
5

Hipster beer.
5-5

6. Normal burger:
6

Hipster burger.
6-6

7. Normal chips:
7

Hipster chips.
7-7

8. Normal coffee:
8

Hipster coffee.
8-8

9. Normal cereal:
9

Hipster cereal.
9-9

10. Normal breakfasts:
10

Hipster breakfasts.
10-10

11. Normal water:
11

Hipster water.
11-11

12. Normal muffins:
12

Hipster muffins.
12-12

13. Normal spring rolls:
13

Hipster spring rolls.
13-13

14. Normal sandwiches:
14

Hipster sandwiches.
14-14

15. Normal bangers ‘n’ mash:
15

Hipster bangers ‘n’ mash.
15-15

16. Normal restaurants:
16

Hipster restaurants.
16-16

17. Normal sauces:
17

Hipster sauces.
17-17


Eating Dark Chocolate For Breakfast Can Add Years To Your Life

dark chocolate

Since long before Ponce de Leon went looking for the fountain of youth, humans have been wondering how to live longer. Now, Google’s resident futurist Ray Kurzweil—winner of President Clinton’s National Medal of Technology and Innovation and bestselling author of Transcend: Nine Steps to Living Well Forever—has revealed one answer: Eat a healthy diet. Before you say, “Yeah, I’ve heard that one before,” wait till you see Kurzweil’s own diet. It involves chocolate for breakfast, and other delicious things like salmon. It’s pretty detailed, and it doesn’t sound half-bad.

Ray Kurzweil
Ray Kurzweil

The 68-year-old, Bill Gates-endorsed futurist, who pioneered the Singularity concept, recently told Playboy that by 2029, we should all be able to live forever. And he’s taking steps to be in shape when that happens. For instance, here’s a typical Kurzweil breakfast, according to the Financial Times reporter Caroline Daniel, who sat down to a morning meal with him:

“There is a bowl of berries; a plate with smoked salmon and mackerel; six pieces of dark chocolate; a carton of vanilla WestSoy milk, a pile of Stevia sachets, and a bowl of tepid, dense porridge.”

As Kurzwel summed it up to Daniel: “Cocoa is anti-inflammatory and it’s very good for you. So that’s very dark chocolate with some espresso in. Berries, soy milk, unsweetened. Fish and green tea.”

Sounds pretty doable, right?

There’s just one catch: Pills. Lots of pills. Kurzweil told The Financial Times that he spends ” a few thousand dollars a day” on his 100-pills-a-day intake. Business Insider did the rough math, and estimates that’s about $1 million a year.

The good news: Kurzweil used to take more than 250 pills a day, so he’s cut that down by more than half. The question is, how many more years until he gets that pill intake down to zero?


27 Diagrams That Make Cooking So Much Easier

– Download PDF file with all diagrams here.

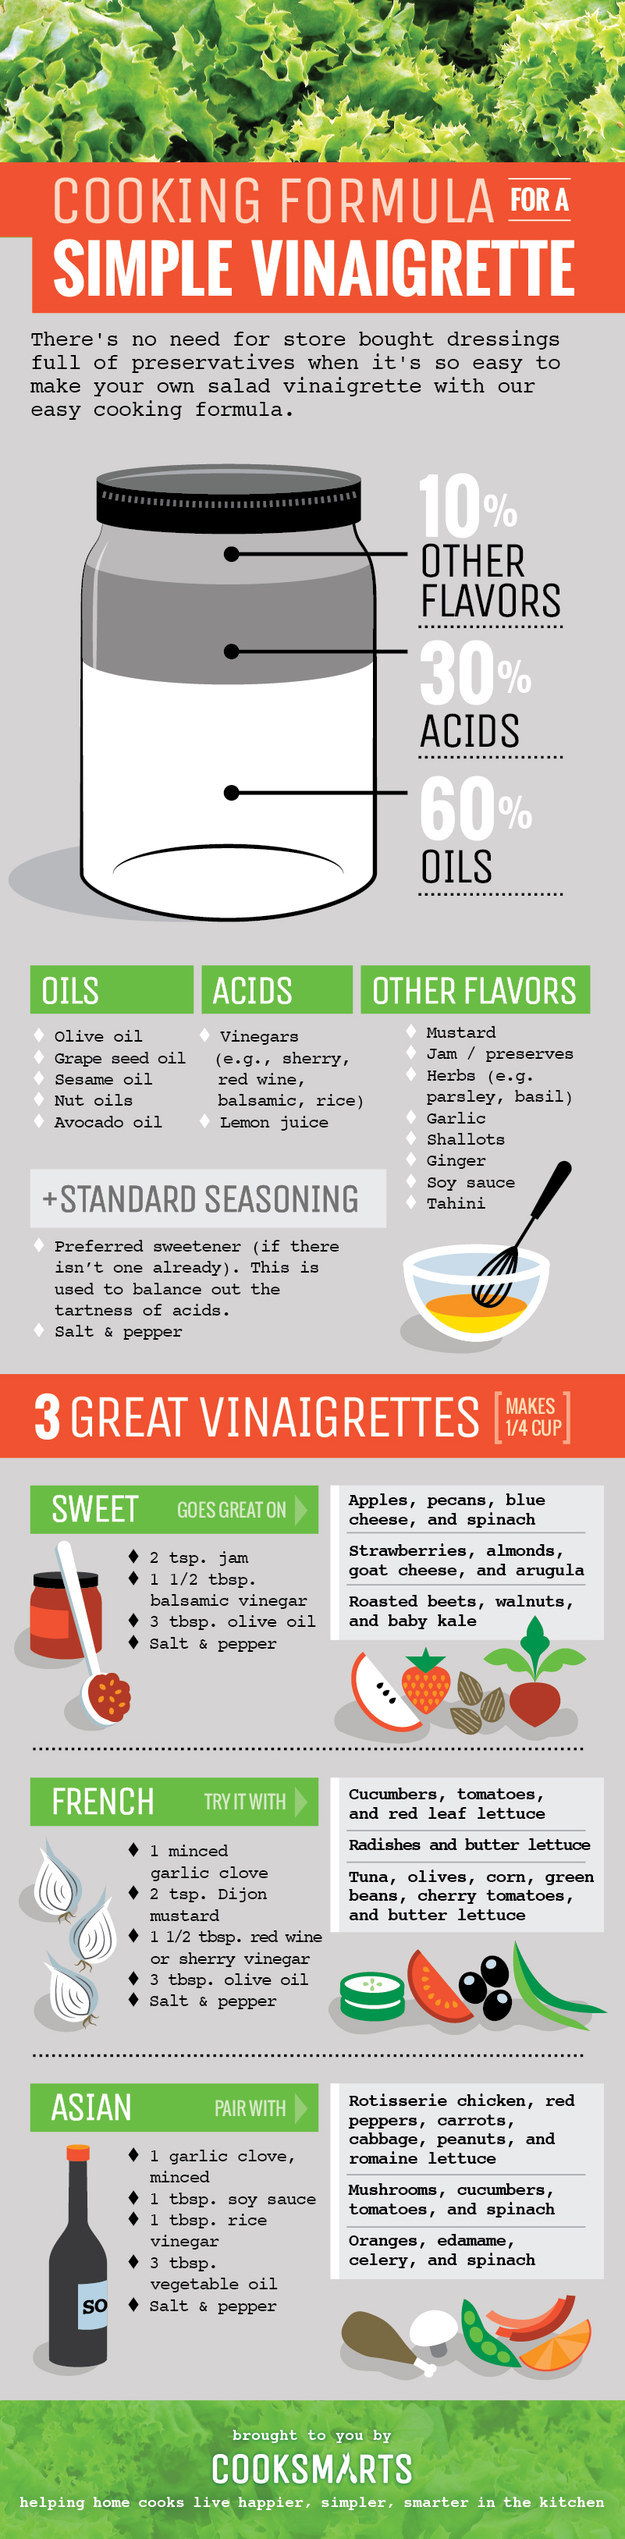
1. For making your own vinaigrette.

1. For making your own vinaigrette.

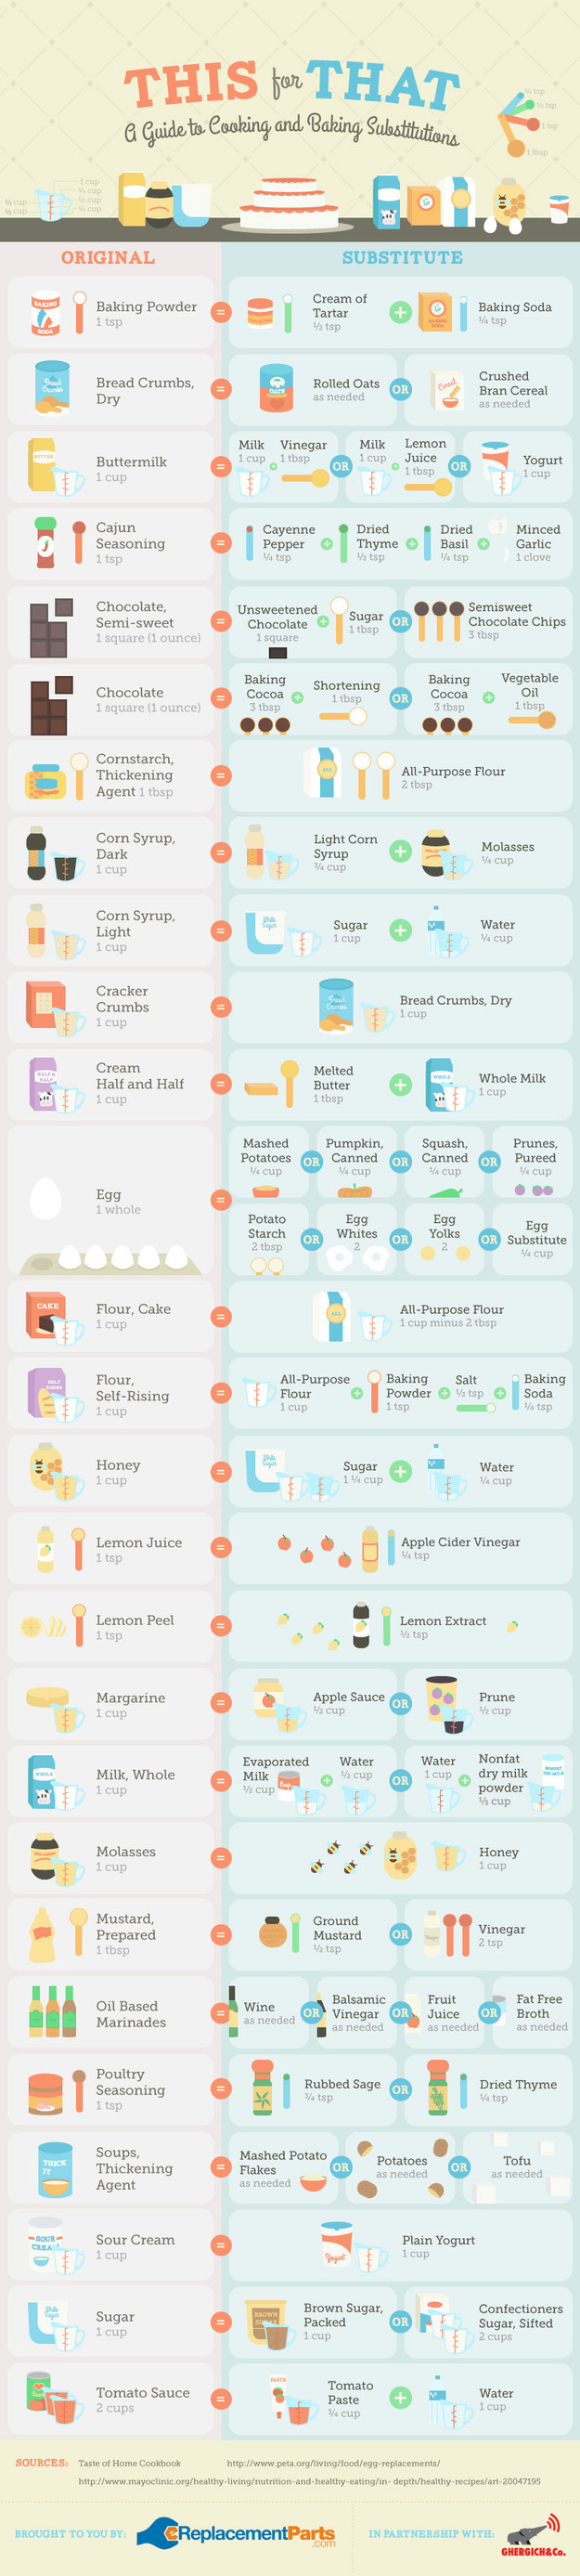
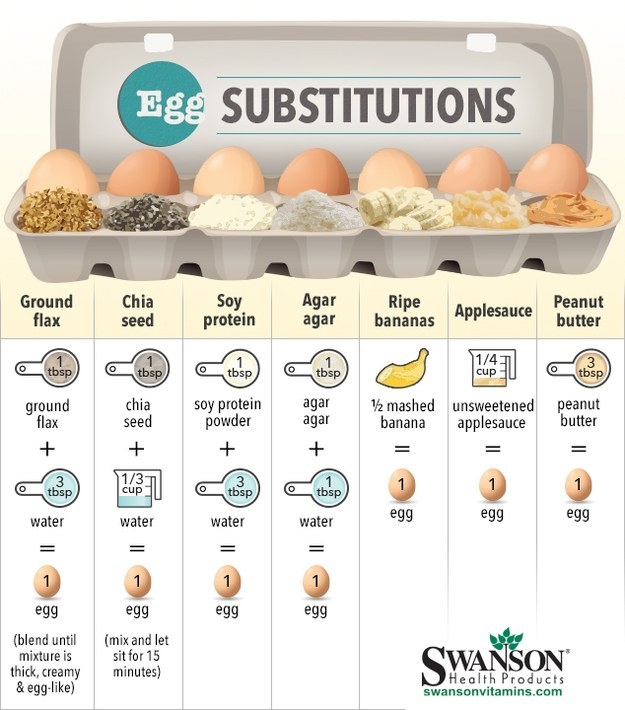
2. For making substitutions when you’re missing an ingredient.

2. For making substitutions when you’re missing an ingredient.

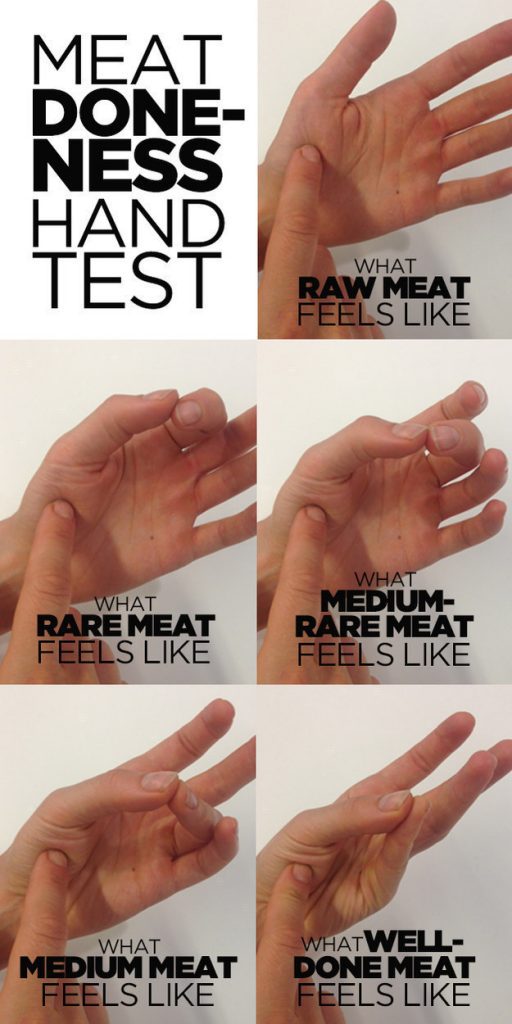
3. For cooking red meat exactly how you like it.

3. For cooking red meat exactly how you like it.

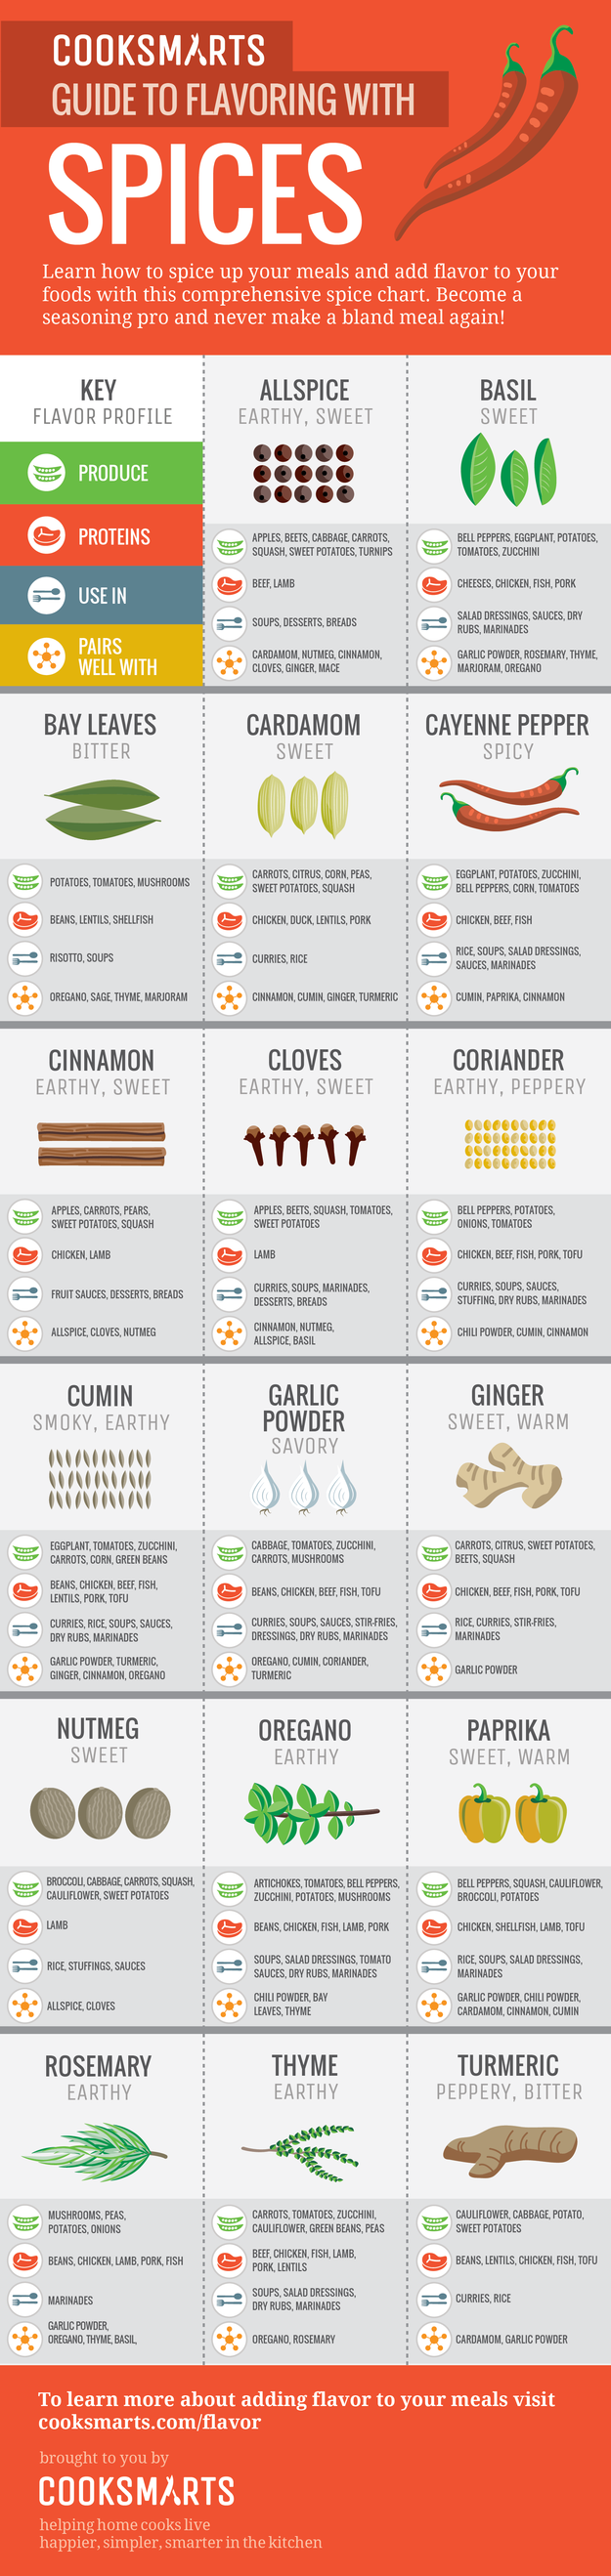
4. For spicing things up.

4. For spicing things up.

5. For making any soup from scratch.

5. For making any soup from scratch.

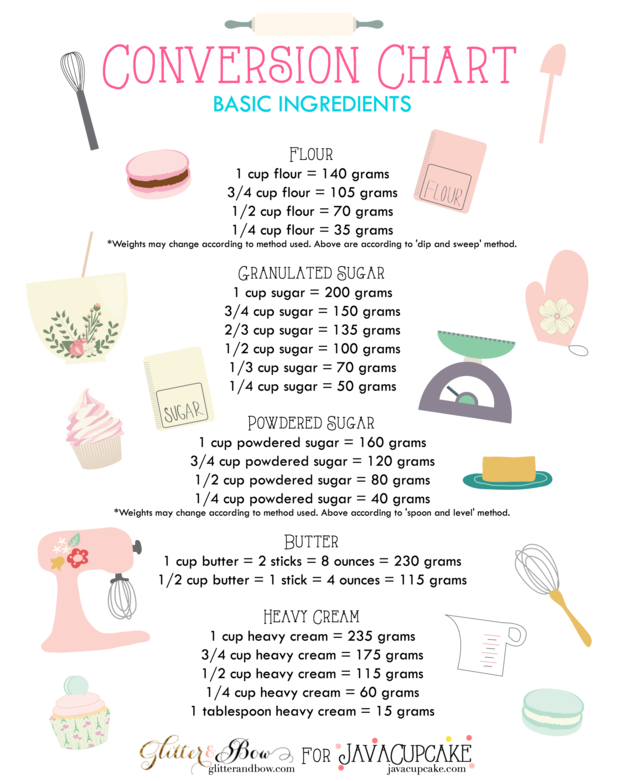
6. For Metric conversions.

6. For Metric conversions.

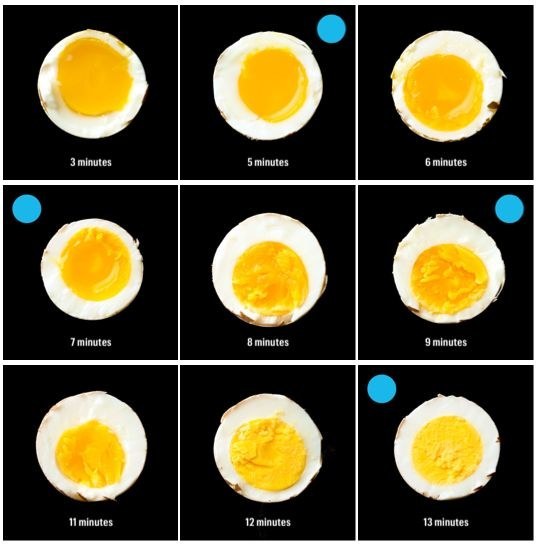
7. For boiling eggs:

7. For boiling eggs:

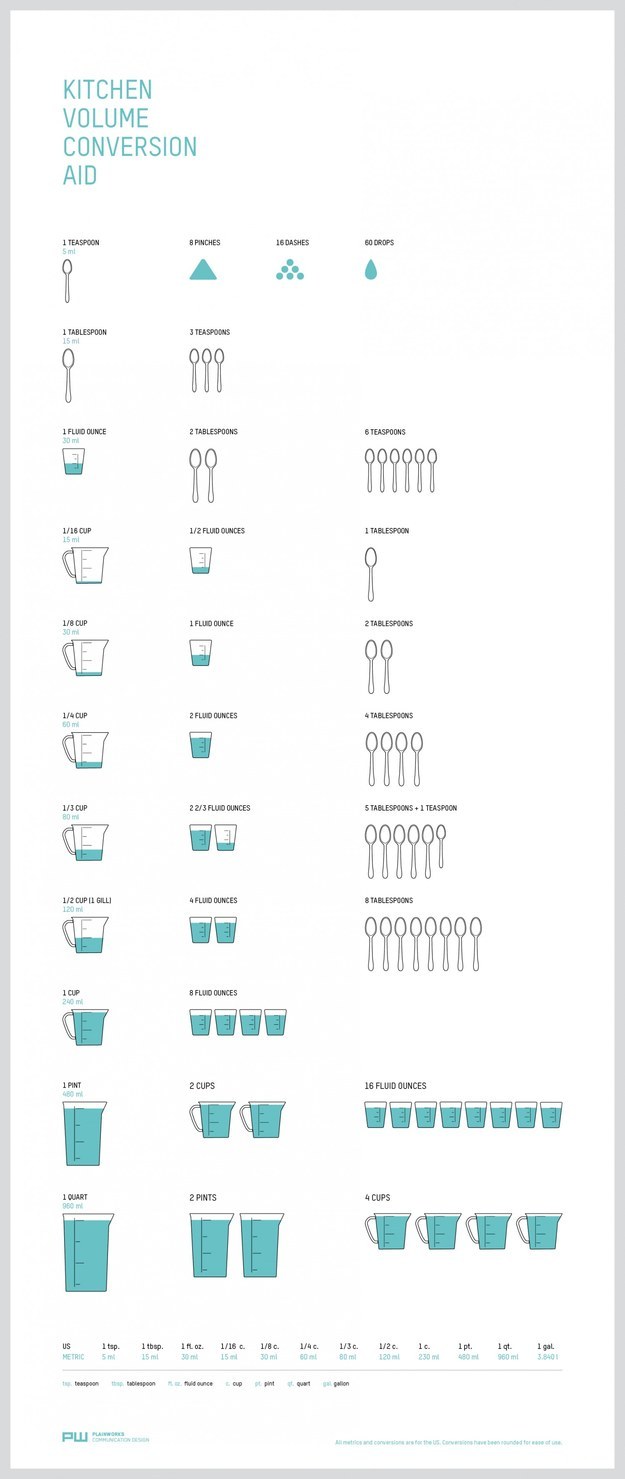
8. For volumetric conversions.

8. For volumetric conversions.

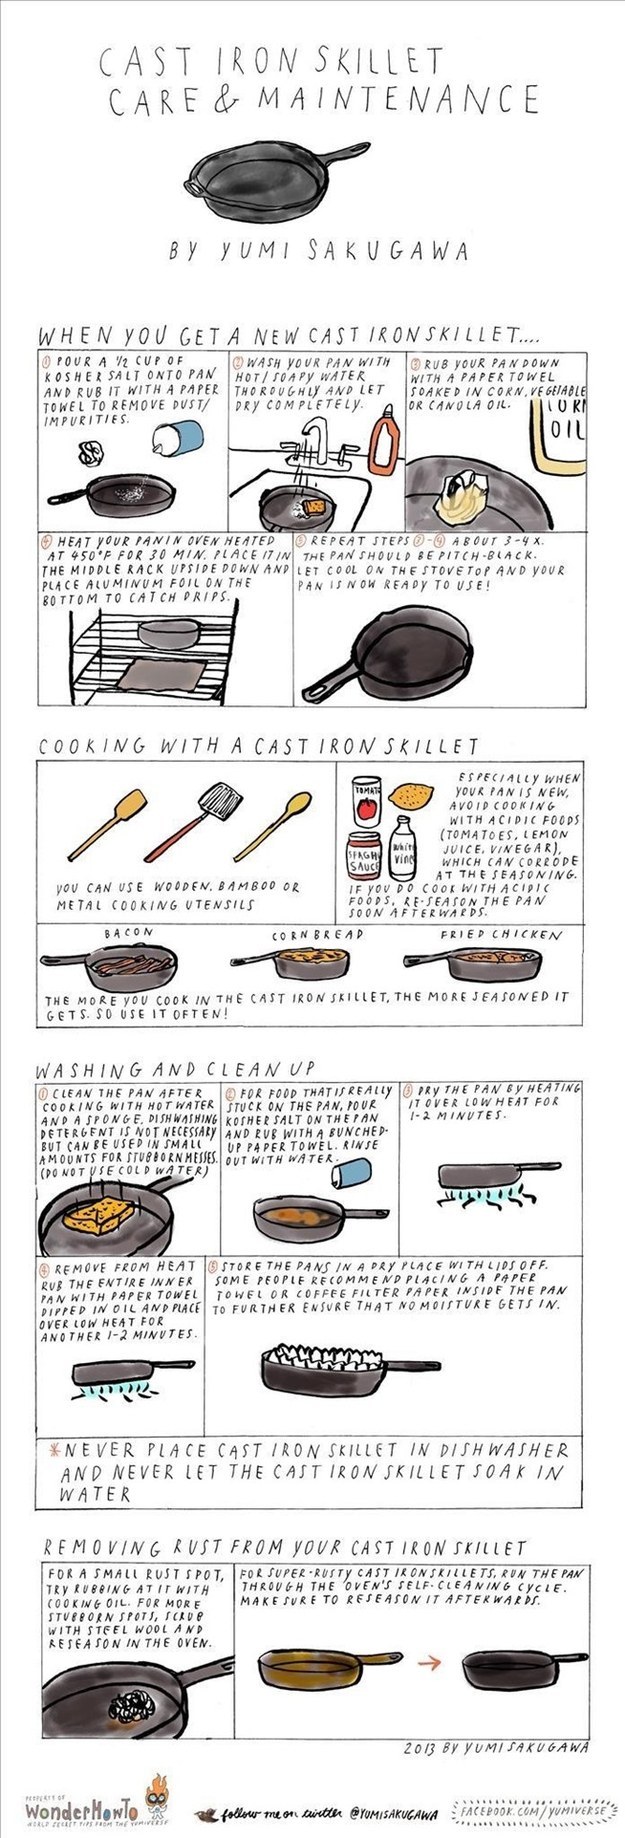
9. For cooking with and maintaining a cast iron skillet.

9. For cooking with and maintaining a cast iron skillet.

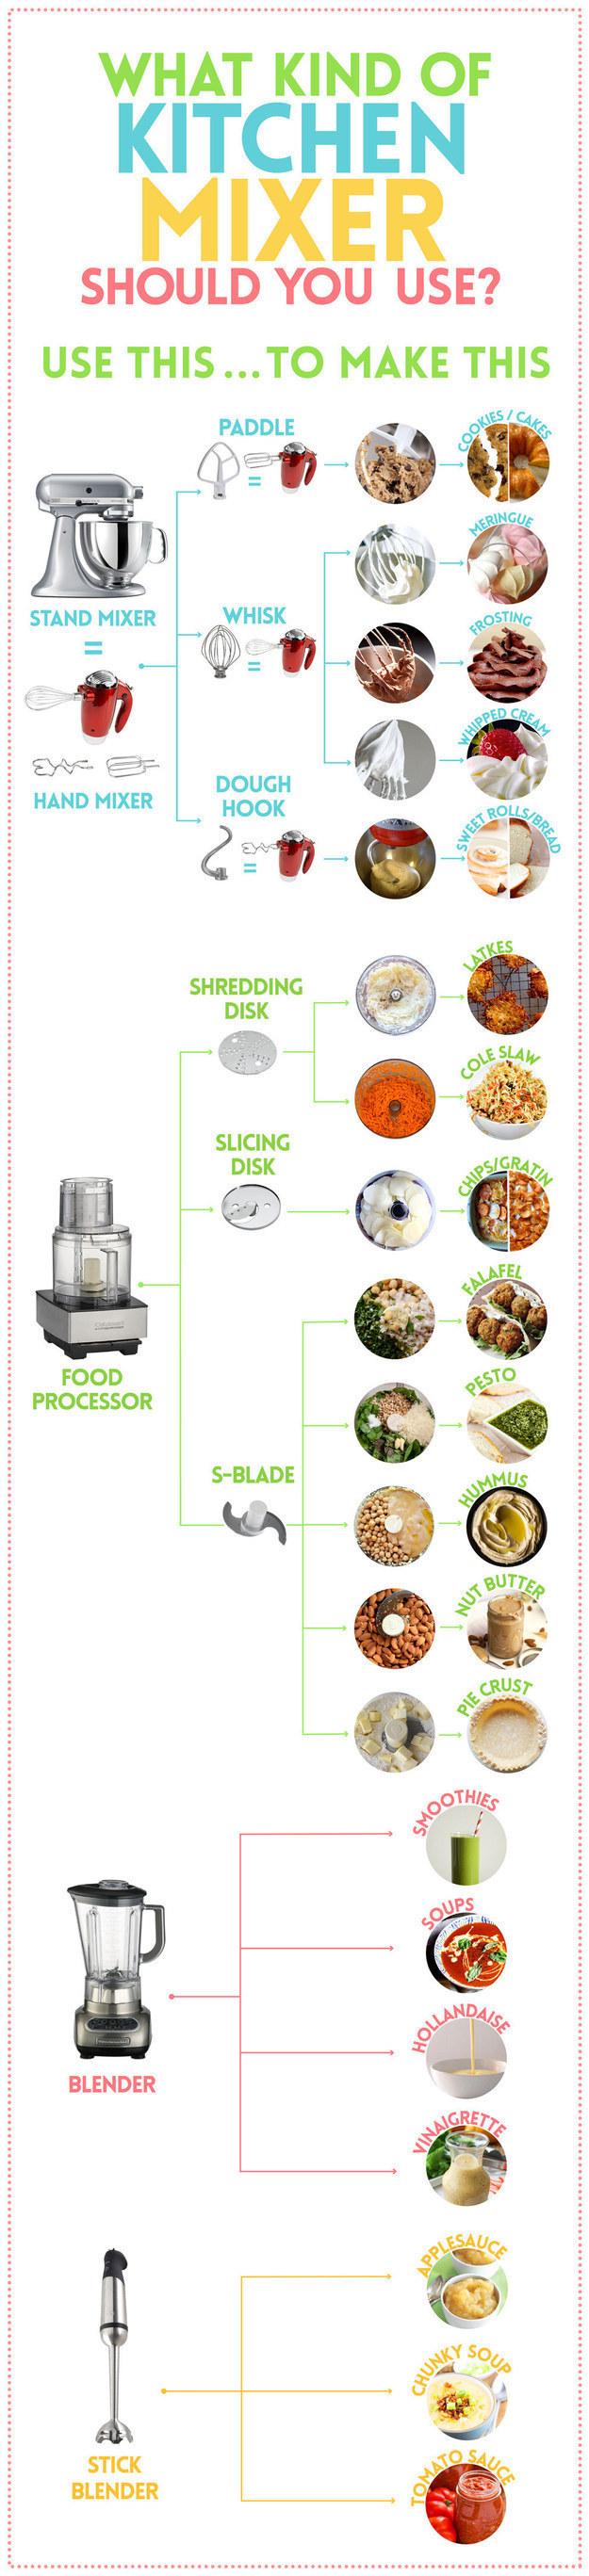
10. For making sure you’re using the right kitchen appliance.

10. For making sure you’re using the right kitchen appliance.

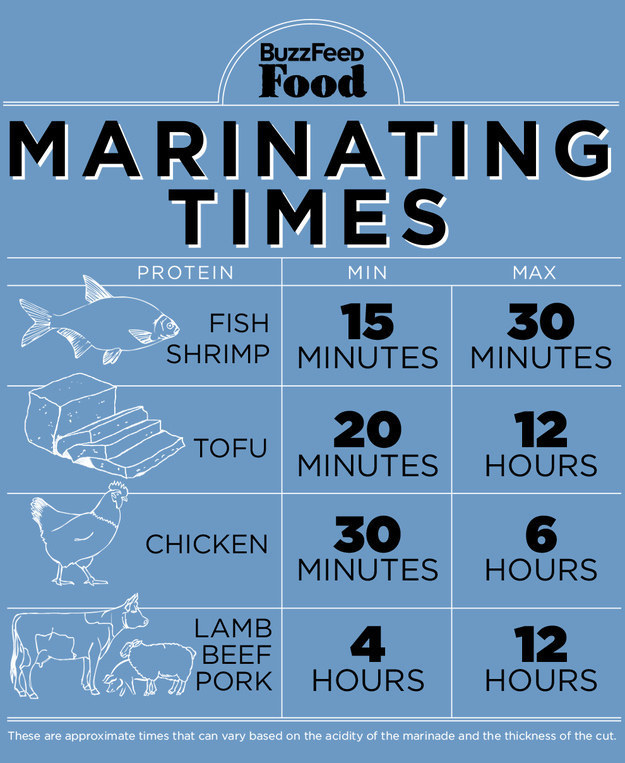
11. For marinating meat to make it tender and delicious.

11. For marinating meat to make it tender and delicious.

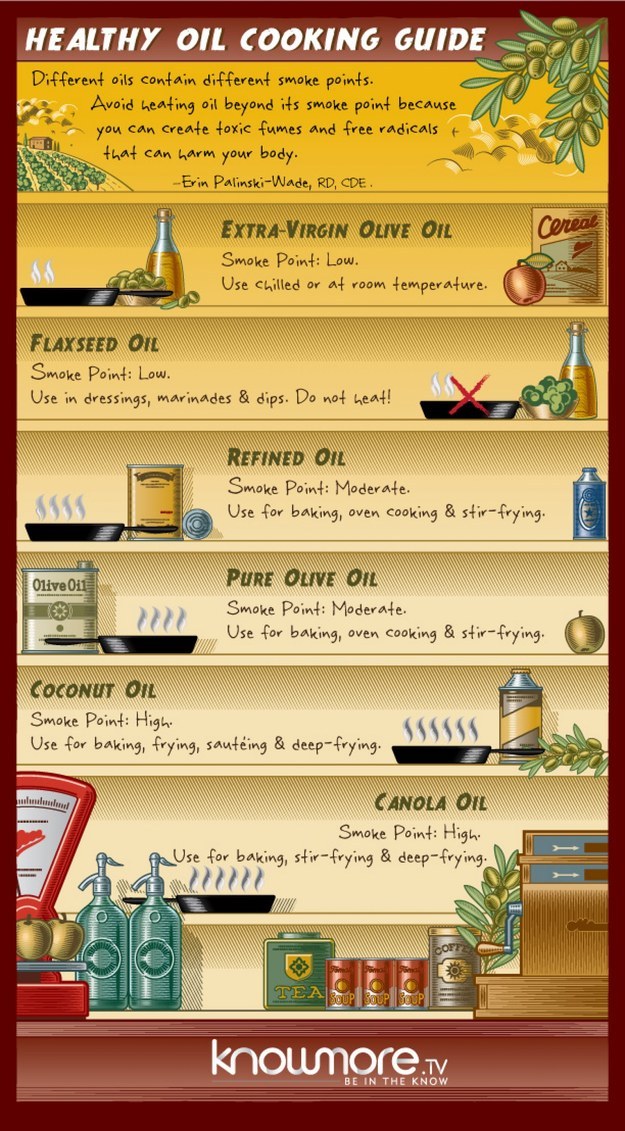
12. For knowing what oil to use.

12. For knowing what oil to use.

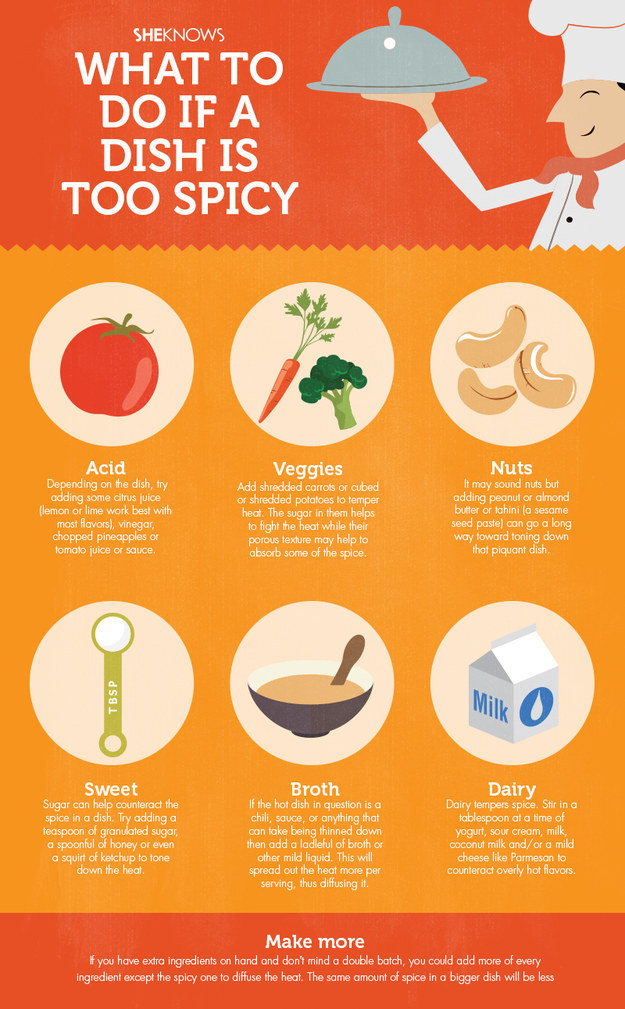
13. For when you’re too heavy-handed with the chili peppers.

13. For when you’re too heavy-handed with the chili peppers.

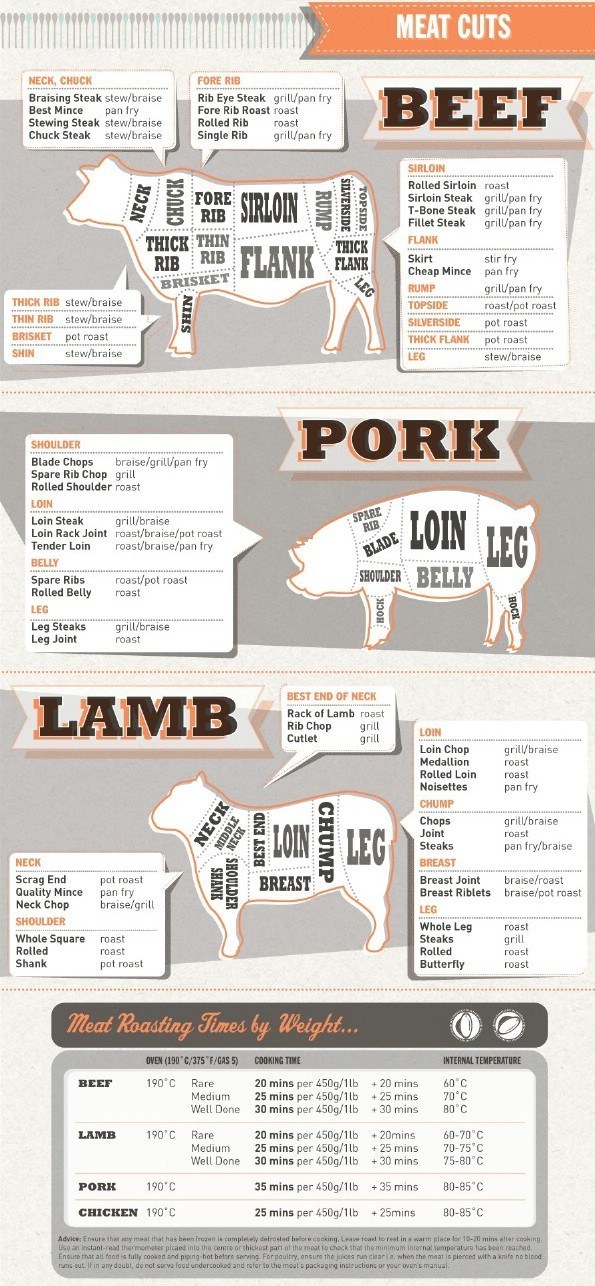
14. For your next trip to the butcher.

14. For your next trip to the butcher.

15. For knife skills.

15. For knife skills.

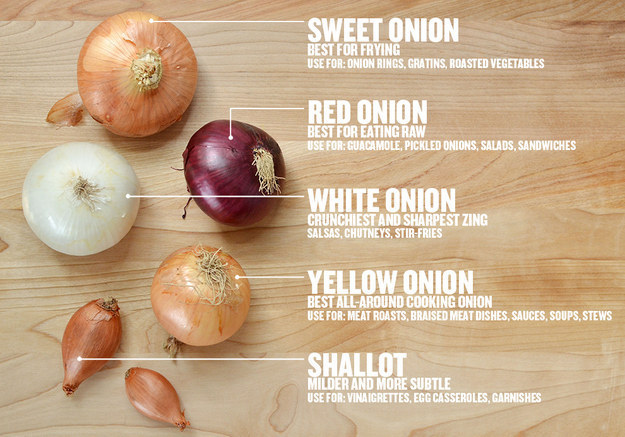
16. For knowing what kind of onion to use.

16. For knowing what kind of onion to use.

17. For vegan baking.

17. For vegan baking.

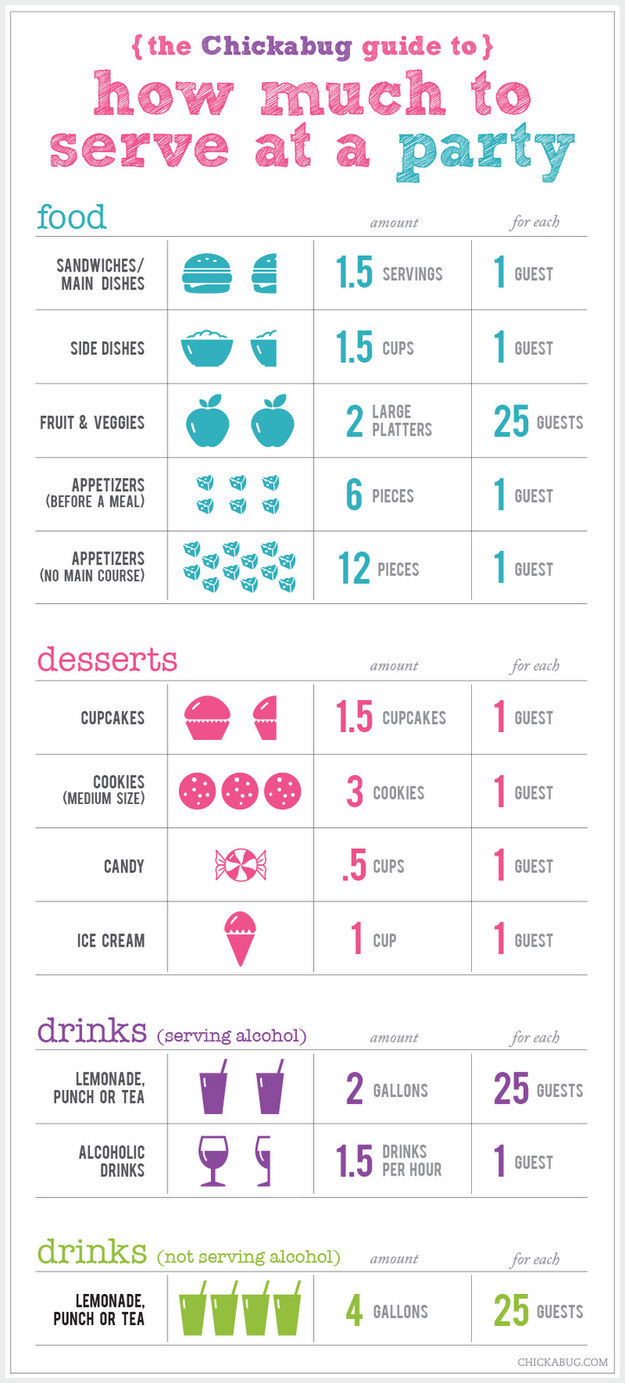
18. For hosting a party.

18. For hosting a party.

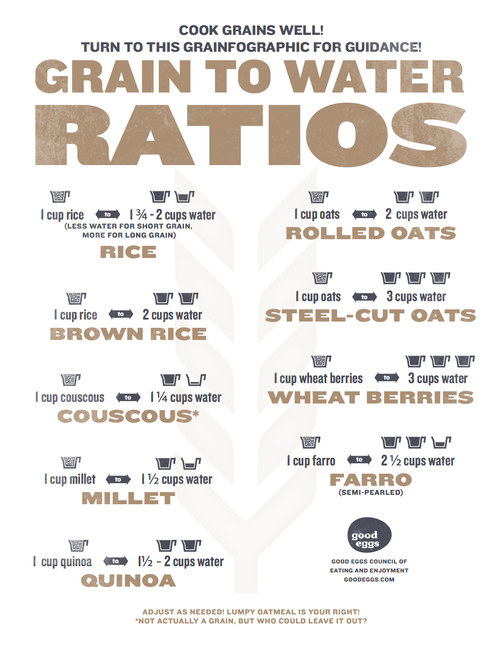
19. For cooking your grains perfectly.

19. For cooking your grains perfectly.

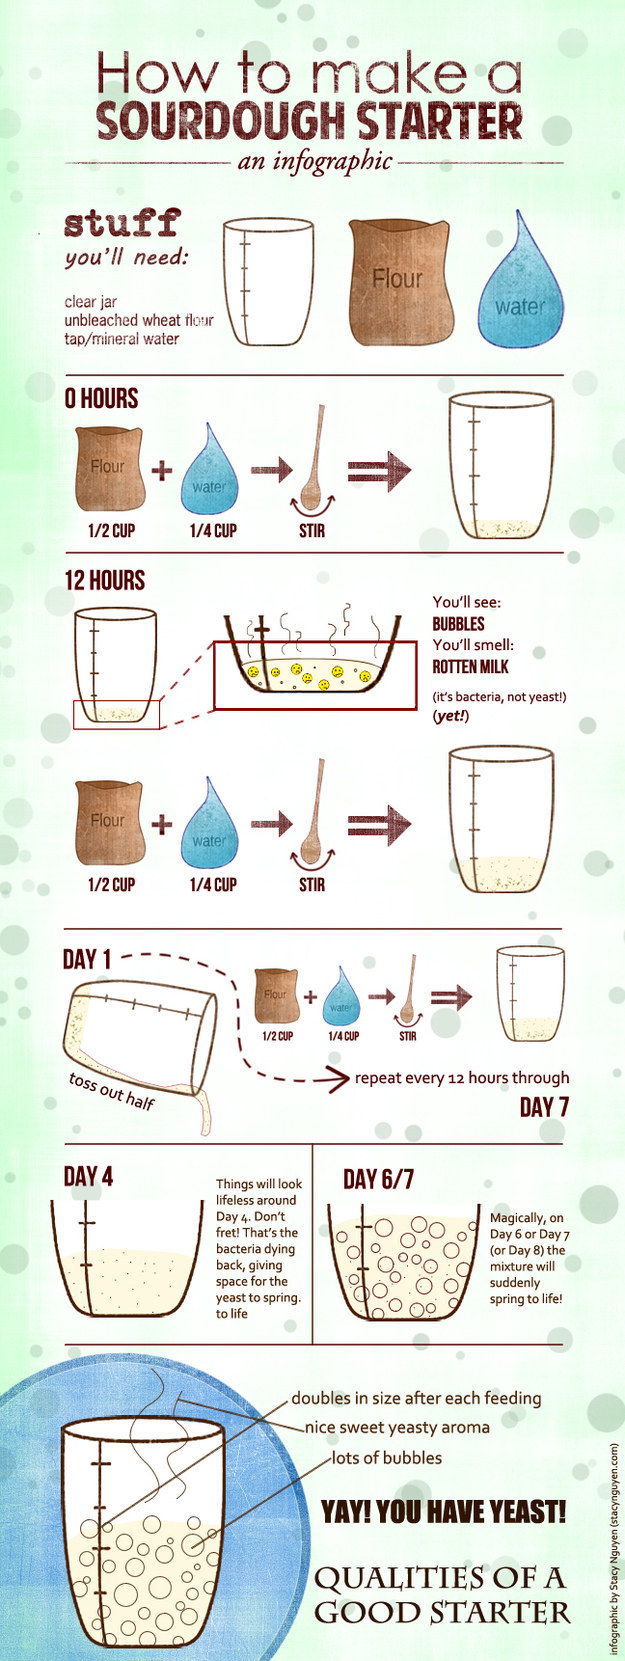
20. For making a sourdough starter.

20. For making a sourdough starter.

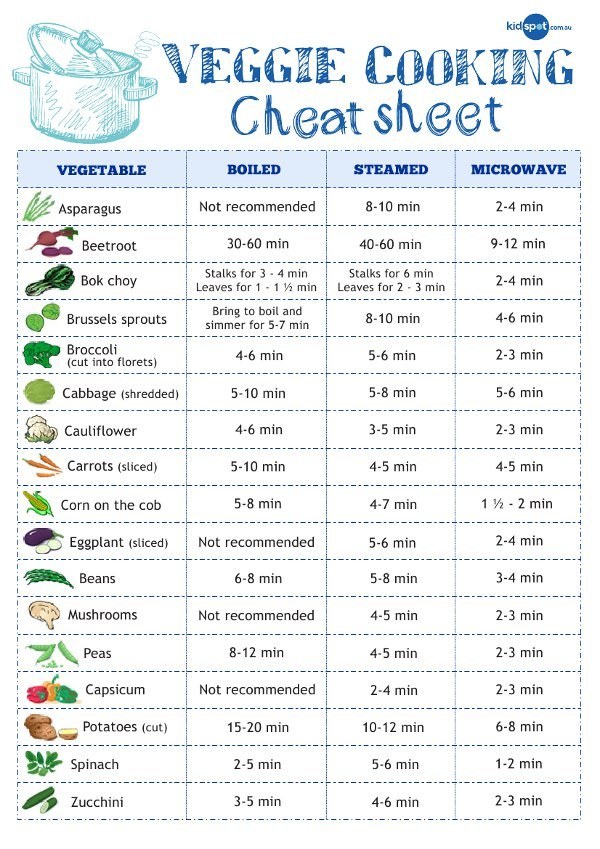
21. For cooking vegetables.

21. For cooking vegetables.

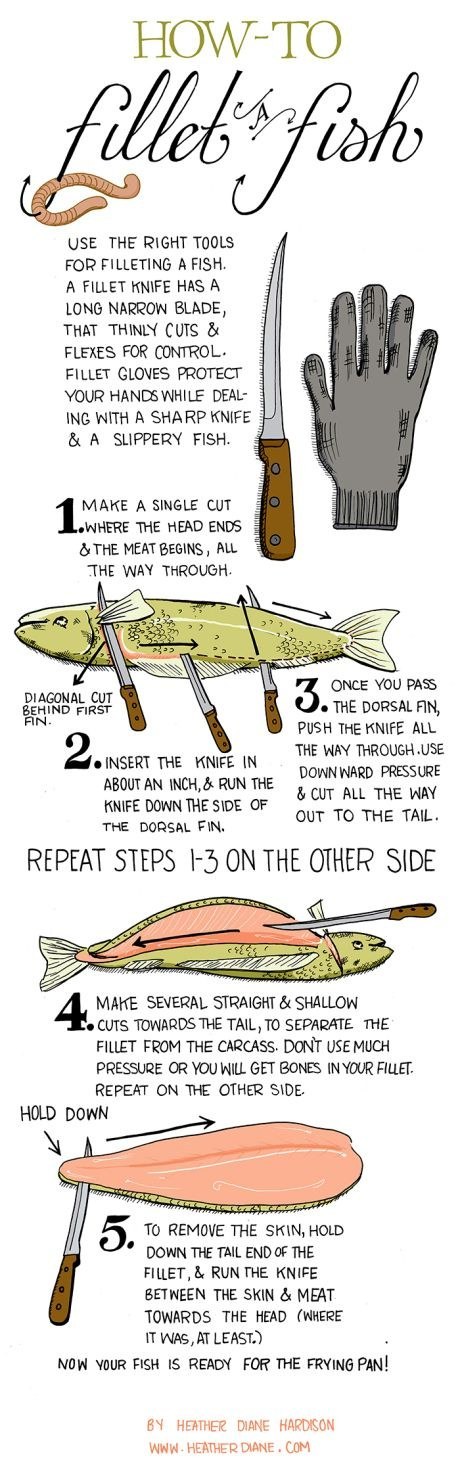
22. For filleting fish.

22. For filleting fish.

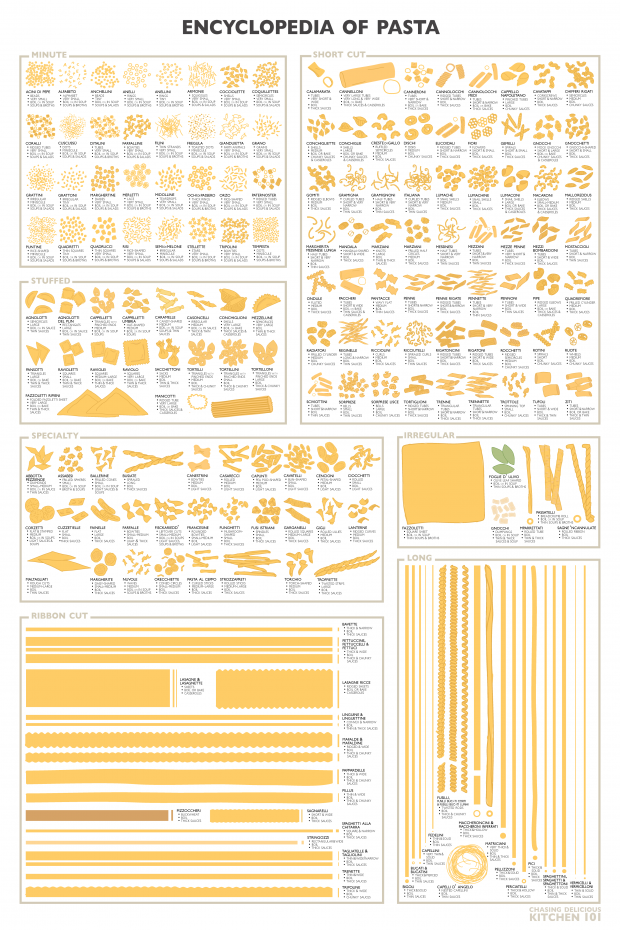
23. For pasta lovers.

23. For pasta lovers.

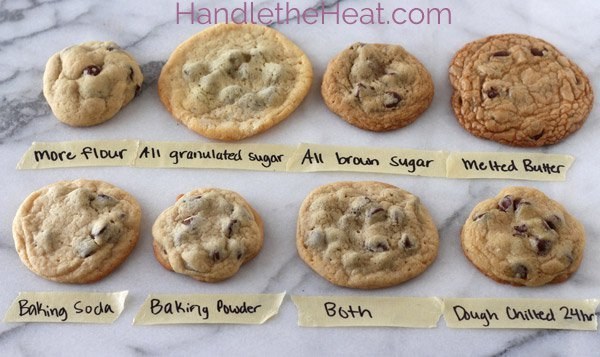
24. For perfect chocolate chip cookies.

24. For perfect chocolate chip cookies.

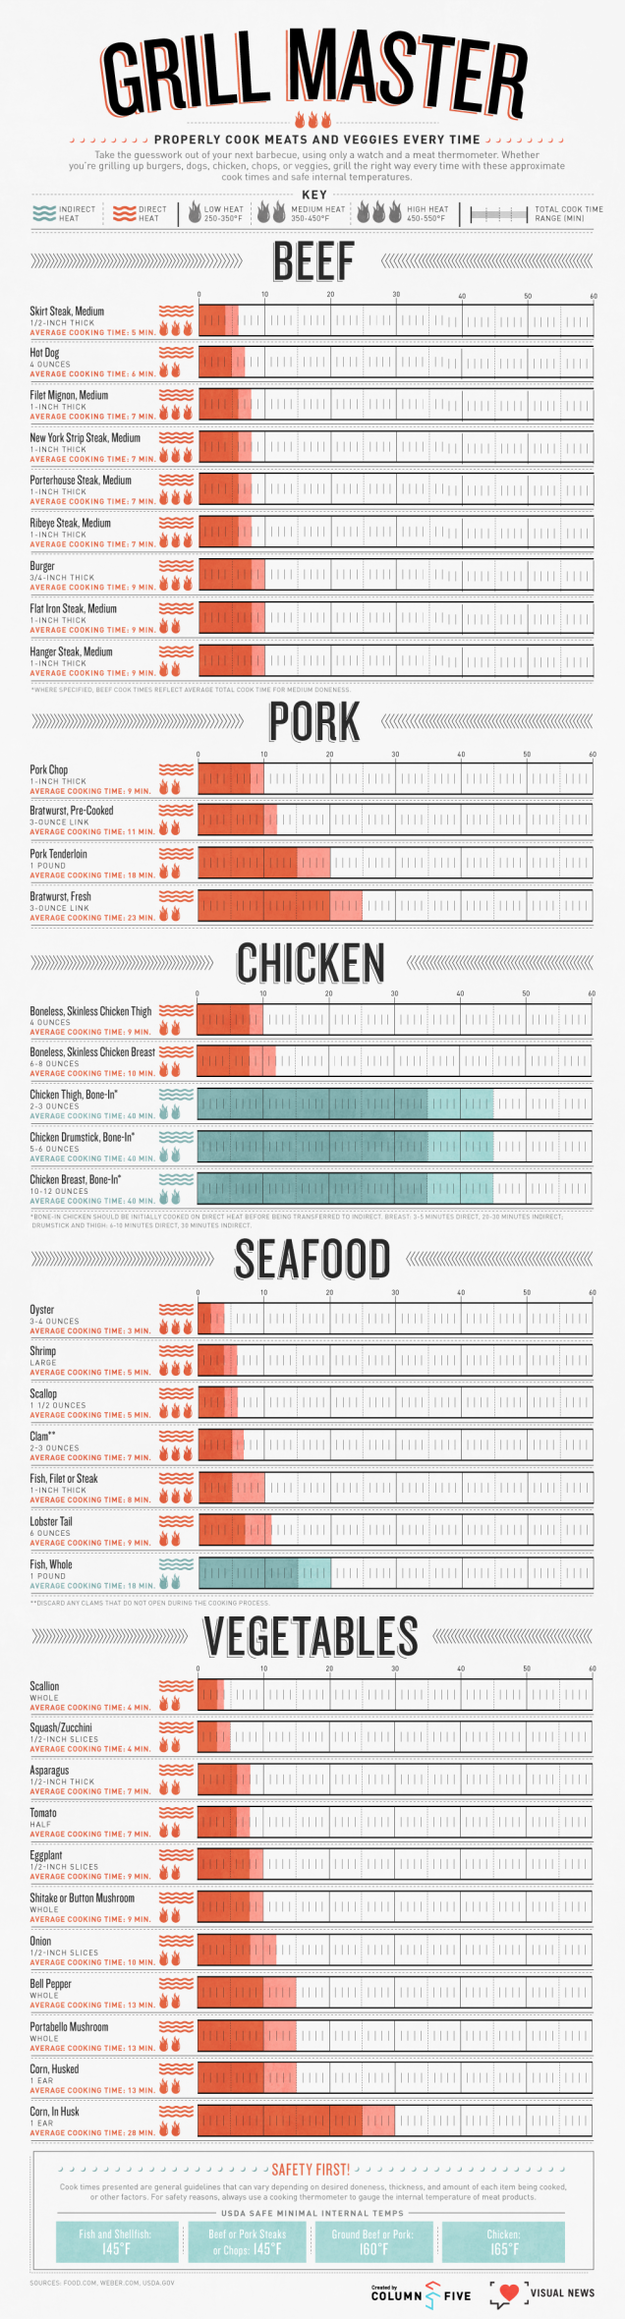
25. For grilling everything.

25. For grilling everything.

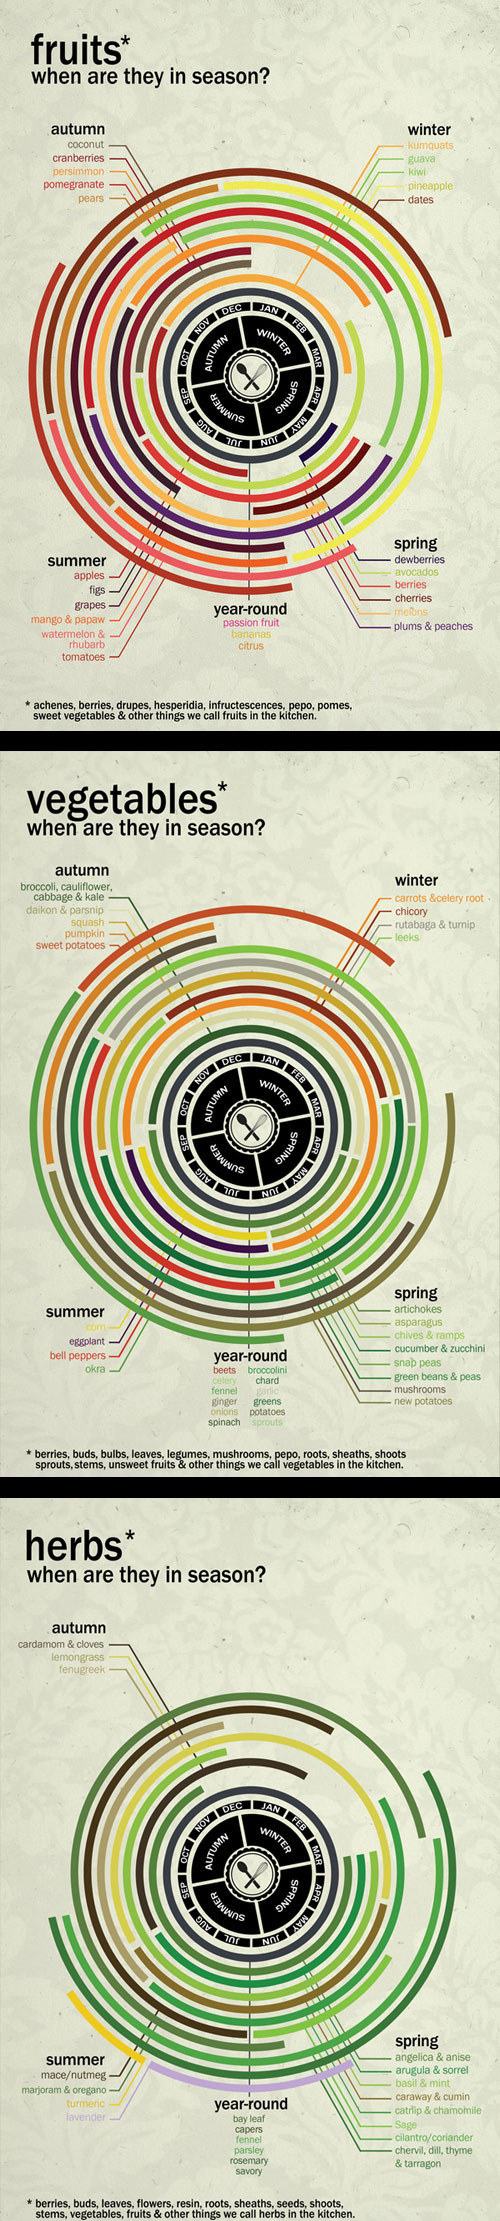
26. For knowing what’s in season.

26. For knowing what’s in season.

27. For knowing exactly how to store your groceries, and for how long.

27. For knowing exactly how to store your groceries, and for how long.

Download PDF file with all diagrams here.

Source


The Breakfast That Will Satisfy Your Morning Craving

Eggs-n-Oats

A delicious breakfast you can make either sweet or savory, that keeps you full all morning (at least)!

Ingredients:
1 whole egg
2 egg whites
1/2 c. rolled oats (Quaker Oats)
2 oz skim milk (just more than a splash)

Directions:
Add all ingredients to bowl, mix well.

Spray non-stick spray (Pam, for example) in a skillet or frying pan.

Add all ingredients; scramble as you would with ordinary eggs.

When eggs-n-oats reach desired texture (just like scrambled eggs–wet, dry, somewhere in between), remove from heat, plate.

There are lots of options for seasoning, which I’m sure people will add to below. I prefer some combination of cayenne, hot sauce, and a moroccan spice blend I have at home. Some people make it sweet with honey, berries, bananas, cinnamon, splenda, agave nevtar, truvia, etc.


Skip the Butter and Use This on Your Grilled Cheese Instead

It’s one of the first dishes we learned to make for ourselves–and it is responsible for at least ten of those 15 pounds we put on in college. But that buttery crunch and gooey cheese is comfort food at its finest. And just when we thought it couldn’t get any better, we found this amazing trick that takes a basic grilled cheese to the next level.

What you need: A nonstick pan, bread, cheese and–wait for it–a few teaspoons of mayonnaise.

What you do: Put the pan over low heat. Here’s where you would typically drop in a chunk of butter, but skip that altogether. (Trust us on this one.) Instead, spread two slices of bread with an even coat of mayo. Place one slice in the pan, mayo side down. Top it with your cheese of choice. Then add the other slice of bread, mayo side up. Let it cook for a few minutes until the bottom is golden brown. Flip and cook on the other side.

Why it works: Mayo spreads better than butter does (crucial when you’re using a softer bread like brioche) and has a higher smoke point (meaning it won’t burn as easily). Plus, the oil and egg in mayonnaise brown nicely andadd a creamy flavor to the crust. You’re welcome.


27 Cooking Hacks That Save Time and Money

1. Add warm water to a glass, dump it out and put the glass over your butter. Creates softened butter in minutes!

2. Unscented dental floss can cut soft foods (cakes, cheese)

3. Make cakes last longer by placing a few pieces of bread on the outer edges.

4. Keep your ice cream in zip lock bags to keep them soft enough to serve with ease.

5. Store some marshmallows with your brown sugar to keep it from clumping

6. Run out of mayonnaise? Mix one cup of oil and an egg together to get homemade mayonnaise.

7. Avoid having splatters when using your mixer by poking the ends of your mixer beaters through the middle of a paper plate before you attach them to the mixer.

8. Pre-cook pasta and it will cook in less than a minute.

9. Microwave an ear of corn and it’ll fall right out of the husk.

10. Coat your cheese grater with nonstick spray for easy shredding.

11. Don’t waste time peeling your potatoes before you cook them. After cooking they will glide off.

peel a potato

12.Test your baking soda by adding a teaspoon full to ½ cup of hot water. If it bubbles, it’s still good.

13. If you boil garlic cloves for thirty seconds, the peels come off easily.

14. Use a cooling rack when cooking fried foods to help them maintain their crispiness.

15. Take an onion cut in half and run it across your grill grates to make the grill non-stick.

16. Put a hole in your burger patties to allow for even cooking.

17. The soda can top works great as a vegetable peeler too.

18. Freeze grapes and use them as ice to keep your wine chilled without watering it down.

19. Use a pant hanger as a cookbook holder.

20. Cookies stay fresh longer if stored with an apple wedge.

21. 2 Tablespoons of mayonnaise will make your cakes extra moist.

22. Store plastic wrap in a freezer for easier handling.

23. Doritos are great for kindling a fire.

dorito

24. Don’t mess up your bread, but cutting it from the bottom first.

25. To keep your burger from crumbling add bread crumbs to the mix.

26. A bit of Vodka in your pie crust will make it for some flaky goodness.

27. Did you make your sauce to thin? Add a piece of dried pasta noodle to the mix and once it’s soaked up the excess liquid take it out.


10 foods to boost your brainpower

Eating well is good for your mental as well as your physical health. The brain requires nutrients just like your heart, lungs or muscles do. But which foods are particularly important to keep our grey matter happy?

1. Opt for wholegrains
Like everything else in your body, the brain cannot work without energy. The ability to concentrate and focus comes from the adequate, steady supply of energy – in the form of glucose in our blood to the brain. Achieve this by choosing wholegrains with a low-GI, which release glucose slowly into the bloodstream, keeping you mentally alert throughout the day. Opt for ‘brown’ cereals, wheatbran, granary bread and brown pasta.

2. Eat oily fish
Essential fatty acids (EFAs) cannot be made by the body and must be obtained through diet. The most effective omega-3 fats occur naturally in oily fish as EPA and DHA. Good sources include linseed (flaxseed) oil, soya bean oil, pumpkin seeds, walnut oil and soya beans. They are good for healthy brain function, the heart, joints and general wellbeing. Oily fish contains EPA and DHA in a ready-made form, which enables the body to use it easily. The main sources of oily fish include salmon, trout, mackerel, herring, sardines, pilchards and kippers. Low DHA levels have been linked to a higher risk of developing Alzheimer’s disease and memory loss.

3. Binge on blueberries
Evidence accumulated at Tufts University in the United States suggests that the consumption of blueberries may be effective in improving or delaying short term memory loss. Widely available, so there’s no excuse.

4. Eat more tomatoes
There is good evidence to suggest that lycopene, a powerful antioxidant found in tomatoes, could help protect against the kind of free radical damage to cells which occurs in the development of dementia, particularly Alzheimer’s.

5. Add vitality with vitamins
Certain B vitamins – B6, B12 and folic acid – are known to reduce levels of homocysteine in the blood. Elevated levels of homocysteine are associated with increased risk of stroke, cognitive impairment and Alzheimer’s disease. A study of a group of elderly patients with mild cognitive impairment found that after two years of intervention with high doses of B6, B12 and folic acid there was significantly less brain shrinkage compared to a subset given placebo treatment.

6. Get a blackcurrant boost
Vitamin C has long been thought to have the power to increase mental agility. One of the best sources of this vital vitamin are blackcurrants.

001

7. Pick up pumpkin seeds
Just a handful of pumpkin seeds a day is all you need to get your recommended daily amount of zinc, vital for enhancing memory and thinking skills.

8. Bet on broccoli
A great source of vitamin K, which is known to enhance cognitive function and improve brainpower.

9. Sprinkle on sage
Sage has long had a reputation for improving memory and although most studies focus on sage as an essential oil, it could be worth adding fresh sage to your diet too.

10. Go nuts
A study published in the American Journal of Epidemiology suggests that a good intake of vitamin E might help to prevent cognitive decline, particularly in the elderly. Nuts are a great source of vitamin E along with leafy green vegetables, asparagus, olives, seeds, eggs, brown rice and wholegrains.

Brainpower supplements
Although research linking diet and dementia is still in its infancy, there are a few important relationships between nutrients and brain health that are worth exploring. Having a nourishing, well rounded diet gives our brain the best chance of avoiding disease. If your diet is unbalanced for whatever reason, you may want to consider a multivitamin and mineral complex and an omega-3 fatty acid supplement to help make up a few of the essentials. If you are considering taking a supplement it is best to discuss this with a doctor or qualified healthcare professional.


17 Flourless Satisfying Desserts

Peanut Butter Flourless Chocolate Cake


1. Samuel’s Salted Caramel Peanut Brownie Bombs

Samuel’s Salted Caramel Peanut Brownie Bombs

Recipe here.

2. Chocolate Chip Cheesecake Cookie Dough Cups

Chocolate Chip Cheesecake Cookie Dough Cups

Recipe here.

3. Milk Chocolate Mousse Shots

Milk Chocolate Mousse Shots

Recipe here.

4. Chocolate Covered Coconut Bars

Chocolate Covered Coconut Bars

Recipe here.

5. Flourless Gluten Free Chickpea Cake

Flourless Gluten Free Chickpea Cake

Recipe here.

6. Flourless Souffléd Chocolate Cupcakes With Salted Chocolate Ganache

Flourless Souffléd Chocolate Cupcakes With Salted Chocolate Ganache

Recipe here.

7. Chocolate Flourless Cake With Raspberry Sauce

Chocolate Flourless Cake With Raspberry Sauce

Recipe here.

8. Flourless Fudge Brownies

Flourless Fudge Brownies

Recipe here.

9. Flourless Mocha Cake With Creme Anglaise

Flourless Mocha Cake With Creme Anglaise

Recipe here.

10. Homemade Gourmet Chocolate

Homemade Gourmet Chocolate

Recipe here.

11. Flourless Peanut Butter Cookies

Flourless Peanut Butter Cookies

Recipe here.

12. Flourless Mandarin, Almond & Blueberry Cake

Flourless Mandarin, Almond & Blueberry Cake

Recipe here.

13. Flourless Raspberry Cake

Flourless Raspberry Cake

Recipe here.

14. Flourless Cookie Dough Sandwich Cookies

Flourless Cookie Dough Sandwich Cookies

Recipe here.

15. Flourless Chocolate Chip Cookie Skillet

Flourless Chocolate Chip Cookie Skillet

Recipe here.

16. Cherry Vanilla Baked Alaska

Cherry Vanilla Baked Alaska

Recipe here.

17. And Peanut Butter Flourless Chocolate Cake

Peanut Butter Flourless Chocolate Cake

Recipe here.


7 Easy Kitchen Hacks

Honestly, there are a few kitchen annoyances that we just can’t stand. Crying from an onion? Hardened brown sugar? WARM wine?! NO MORE! We have 7 solutions to 7 of the worst kitchen problems.

1. Tears From An Onion: Rub white vinegar over your chopping board

2. Can’t Open A Bottle: Add 1 rubber band on the body and 1 on the lid, twist!

3. Is This Egg Good? Gently drop in a glass filled with water, if it sinks, get crackin’!

4. Naturally Disinfect Your Chopping Board: Cover with kosher salt & firmly rub with half a lemon, rinse!

5. Can’t Peel An Egg? Add 1 tsp of baking soda to cold water, bring to a boil then take off heat and let sit for 12 minutes (crack & go!)

6. Keep Sugar Soft: Add a couple of large marshmallows to the mix

7. Keep Your Wine Chilled: Freeze frozen grapes in advance then add to your glass (they don’t dilute your drink!)


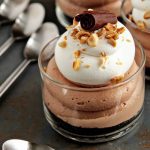
The Best Ever No-Bake Nutella Cheesecakes

Nutella-Cheesecakes

This little find rekindled my love affair with all things Nutella in a big way. The entire weekend turned into a pretty ridiculous Nutella recipe marathon. First in queue are these incredibly delicious and ridiculously simple No Bake Nutella Cheesecakes.

Ingredients:

FOR THE CRUST
12 Oreo Cookies, crushed into crumbs
3 tablespoons unsalted butter, melted

FOR THE FILLINGNutella-Cheesecakes
1 (8 ounce) package cream cheese, softened
2/3 cup Nutella
1 teaspoon pure vanilla extract
1 (8 ounce) tub frozen whipped topping, thawed

FOR THE GARNISH
whipped topping, optional
chocolate shavings, optional
toasted, chopped hazelnuts, optional

Directions:
In a medium bowl, stir together the Oreo cookie crumbs and melted butter. Evenly divide the crumbs between your individual serving dishes and press into the bottoms of the dishes to form a crust layer.
In a large bowl, with an electric mixer, beat the cream cheese and Nutella until smooth. Add vanilla and mix to combine. Using a rubber spatula, fold in the whipped topping until well blended and no streaks remain.
Evenly pipe or spoon the filling into individual serving dishes. Cover with plastic wrap and refrigerate for at least 2 hours before serving.
If desired, garnish with additional whipped topping, chocolate shavings, and/or toasted, chopped hazelnuts.


Lamb With Veggies

lamb with vegetables

About the only time most guys have lamb is at Easter, but it’s a good choice year-round. Similar to beef, it’s loaded with protein. Plus, it’s usually pasture-raised, meaning the fat in it is healthier and lacks added hormones and antibiotics. Add a lean coleslaw, and you’ve got a meal that’s in season any time you’re hungry.

Ingredients
1 rack of lamb (about 1 1/2 pounds, or 8 ribs), cut into chops and trimmed of fat
salt and pepper, to taste
1lb carrots
3 tbsp Dijon mustard
2 tbsp extra-virgin olive oil
2 tbsp finely chopped fresh cilantro
2 tbsp chopped scallions
2 tbsp red wine vinegar
1 tsp loosely packed orange zest

Directions
1. Heat a large skillet over medium-high heat. Season lamb with salt and pepper and add to skillet. Sear one side, then cook for 2 minutes on each side.
2. While the lamb cooks, add carrots to a running food processor, using chopper to push carrots through. Or grate the carrots on the large holes of a box grater.
3. In a large mixing bowl, whisk together Dijon mustard, olive oil, cilantro, scallions, vinegar, and orange zest. Add carrots and, with clean hands, toss with the dressing until carrots are well coated. Season with pepper. Let carrots marinate for 10 minutes. Serve with the lamb.


49 Most Essential Kitchen Secrets

From creative solutions for leftovers to a quick fix for too-salty soup, these helpful
tips and tricks can save you time and money.

1. Make Sure Eggs are Fresh
If you’re unsure of an egg’s freshness, see how it behaves in a cup of water: Fresh eggs
sink; bad ones float.

01

2. Extend Veggie Freshness
Line the bottom of your refrigerator’s crisper drawer with paper towels. They’ll absorb
the excess moisture that causes veggies to rot.

Fridge filled with fruits and vegetables

3. Keep Champagne Bubbly
Don’t throw away sparkling wine or champagne that’s gone flat. Restore the bubbles by
dropping a raisin or two into the bottle. The natural sugars will work magic.

Sweden, Champagne in ice buckets

4. Don’t Waste Lemons
If you need only a few drops of lemon juice, avoid cutting the lemon in half — it will
dry out quickly that way. Instead, puncture the fruit with a metal skewer and squeeze
out exactly what you require. If you wonder what to do with rest of lemon, there is a 66 life changing thing you can do with a lemon.

04

5. Keep Herbs Fresh
To keep herbs tasting fresh for up to a month, store whole bunches, washed and sealed in
plastic bags, in the freezer. When you need them, they’ll be easier to chop, and they’ll
defrost the minute they hit a hot pan.

05

6. Repel Bugs
A bay leaf slipped into a container of flour, pasta, or rice will help repel bugs.

Bottle of spilled bay leaves

7. Make Mushrooms Slime-Free
Prevent mushrooms from getting slimy by wrapping them in paper towels before
refrigerating.

07

8. Avoid Stale Muffins
To revive day-old muffins, sprinkle them with water, place in a paper bag, and pop in a
hot oven for five to 10 seconds. The steam created by the water will restore moisture.

08

9. Don’t Let Cheese Dry Out
Stop cheese from drying out by spreading butter or margarine on the cut sides to seal in
moisture. This is most effective with hard cheeses sealed in wax.

09

10. Make Veggies Crunchy
When radishes, celery, or carrots have lost their crunch, simply pop them in a bowl of
iced water along with a slice of raw potato and watch the limp vegetables freshen up
right before your eyes.

10

11. Don’t Let Cookies Get Hard
Store crispy and chewy cookies in separate containers. If you combine them, the moisture
from the chewy cookies will make the crispy ones lose their crunch.

Tin of Cookies

12. Prevent Bananas From Browning
Avoid separating bananas until you plan to eat them—they spoil less quickly in a bunch or you can always make a banana muffins.

12

13. Don’t Let Salt Harden
Put rice in your saltshaker to stop the salt from hardening. The rice absorbs
condensation that can cause clumps.

Kitchen Cabinet

14. Keep Butter Flavorful
Stock up on butter when it’s on sale—you can store it in the freezer for up to six
months. Pack the butter in an airtight container, so it doesn’t take on the flavor of
whatever else you’re freezing.

Fresh baked bread

15. Prevent Bacteria Growth on Dairy
Another dairy tip: In order to make cottage cheese or sour cream last longer, place the
container upside down in the fridge. Inverting the tub creates a vacuum that inhibits
the growth of bacteria that causes food to spoil.

15

16. Keep Honey Clear
Believe it or not, honey is the only nonperishable food substance, so don’t get rid of
the stuff if it crystallizes or becomes cloudy. Microwave on medium heat, in 30-second
increments, to make honey clear again.

16

17. Retain Moisture in Pasta
Prevent extra cooked pasta from hardening by stashing it in a sealed plastic bag and
refrigerating. When you’re ready to serve, throw the pasta in boiling water for a few
seconds to heat and restore moisture.

17

18. Save Your Cheese
You can freeze cheese! After serving, put leftovers back in the original package, wrap
tightly in plastic, and freeze. Defrost in the fridge a day before serving. This trick
works best for soft cheeses with a high fat content.

18

19. Protect Brown Sugar From Hardening
Keeping brown sugar in the freezer will stop it from hardening. But if you already have
hardened sugar on your shelf, soften it by sealing in a bag with a slice of fresh bread
or an apple — or by microwaving on high for 30 seconds.

19

20. Make Soup Less Salty
There’s nothing more frustrating than over-salting a soup or stew you’ve spent countless
hours—and countless dollars in ingredients—making. Try adding wedges of raw potato or
apple to absorb the salt. Simmer for 10 minutes or so, then remove the wedges. If your
soup is still too salty, sprinkle in a spoonful of sugar. If that doesn’t work, a dash
of apple-cider vinegar may do the trick. Finally, try diluting with water or low-sodium
broth.

20

21. Get Rid of Soup Fat
And don’t despair about soup that’s too fatty—it can be fixed. If you have time, put the
pot of soup in the refrigerator, wait 30 minutes, then skim the grease from the top and
reheat. If you’re short on time, add a few ice cubes and remove them as soon as you see
grease sticking to them. Or try tossing a large lettuce leaf into the pot to absorb any
extra oil. Discard the leaf once it looks limp.

21

22. Substitute Yogurt for Cream
In a pinch, yogurt can be substituted for cream in recipes that don’t require cooking.
But yogurt can curdle when cooked—in which case, it’s best to stick with whole milk or
half-and-half.

22

23. Prevent Burnt Milk
If you burn milk while heating it on the stove, add a pinch of salt to temper the
scorched smell and taste.

23

24. Combat Meat Toughness
Marinate inexpensive cuts of meat in at least one of the following: beer; vinegar; or
citrus, papaya, tomato, or pineapple juices. These liquids contain enzymes or acids that
will combat the meat’s toughness.

24

25. Tenderize Meat
And if all else fails, tenderize tough meat by gently scoring the surface with a pizza
cutter—for better results, go against the grain of the meat.

25

26. Save Burnt Gravy
If you burn gravy and don’t have enough time—or pan drippings—to start from scratch,
stir in a teaspoon of smooth peanut butter for each cup of gravy. This should eliminate
any burned taste.

26

27. Cut Corn More Easily
Minimize waste and mess when cutting corn from the cob by mounting the cob in the hollow center of a Bundt cake pan, where it will be secure. When you run a knife down the cob, kernels will collect in the pan.

27

28. Make Juicing More Efficient
Before juicing citrus fruits, roll them back and forth on your kitchen counter to better release liquid from the segments inside.

28

29. Ripen Fruit Quickly
To ripen fruit overnight, place it in a paper bag with an apple. Apples release ethylene gas that hastens the maturing process of other fruits.

29

30. Rid of Containers of Odors
Because plastic food containers are porous, they frequently retain odors even after washing. Store them with crumpled-up black-and-white newspaper inside to absorb odors. Then give containers a rinse before using again.

30

31. Easily Break Down Poultry
A butcher’s trick for breaking down poultry: First, separate the legs from the body. Next, separate the drumsticks from the thighs. Then, separate the wings from the body. Place the chicken breast-side down and cut along each side of the spine to remove the backbone. Finally, cut the breast in half.

31

32. Get A Healthy Dose of Omega 3s
To get a healthy dose of omega-3 fatty acids—without spending a fortune on fresh fish—incorporate canned anchovies into your cooking. Try sautéing them in olive oil and garlic before using, and they’ll dissolve into an olive-like relish. Or buy anchovy paste, which virtually disappears in sauces and salad dressings.

32

33. Keep Cookie Sheet Organized
A vertical file folder can find a new home in the kitchen, keeping cookie sheets upright.

33

34. Freeze Waffles and Pancakes
Package extra pancakes and waffles as single servings in airtight plastic bags and freeze. When you need a quick breakfast, just reheat the frozen treats in your toaster.

34

35. Turn Leftover Mashed Potatoes Into Croquettes
Form cold mashed potatoes into little balls, dip in beaten egg, coat in bread crumbs, and sauté or deep-fry. You can also mix in crabmeat or salmon.

35

36. Put Extra Rice to Good Use
If you’ve cooked more rice than you can eat, make rice pudding by adding butter, cinnamon, sugar, and milk. Or create fried rice by sautéing with a beaten egg, soy sauce, and sliced green onions. Or toss rice with slivered almonds and raisins for a Middle Eastern–inspired pilaf.

36

37. Make Soup Stock More Flavorful
After finishing off a wedge of hard cheese, save the rind and use it to flavor soup stock. Just be sure to remove the rind and strain the broth before serving.

37

38. Make Ice Cubes From Iced Coffee
No need to pour a pot of leftover brewed coffee down the drain. Freeze the liquid in ice-cube trays to add to iced coffee instead of regular ice cubes. Your coffee won’t lose its potency as the cubes melt.

38

39. Save Excess Bacon Fat
It’s almost un-American to throw away bacon fat. Store the useful (if admittedly unhealthy) stuff in an airtight aluminum or stainless steel container in the freezer, and use it to make corn bread or fry eggs or potatoes. You can also use bacon fat instead of oil in a spinach salad: Combine two parts bacon fat to three parts balsamic vinegar. Add one part vegetable oil to the mix if you like a less pungent dressing.

39

40. Prevent Extra Cooked Pasta From Hardening
Stash extra pasts in a sealed plastic bag and refrigerate. When you’re ready to serve, throw the pasta in boiling water for a few seconds to heat and restore moisture.

40

41. Give New Life to Stale Bread
Instead of tossing out stale bread, cut it into small rounds and freeze. Toasted, it makes a cheap, tasty substitute for fancy crackers.

41

42. Give New Life to Stale Bread
Instead of tossing out stale bread, cut it into small rounds and freeze. Toasted, it makes a cheap, tasty substitute for fancy crackers.

42

43. Make Instant Chocolate Pudding
Make instant chocolate pudding with whipping cream instead of water to create a rich-tasting mousse.

43

44. Layer Ice Cream
Layer vanilla ice cream with crushed cookies (or even just cookie crumbs) in a martini glass.

44

45. Make a Mini Trifle
Throw together a trifle with sliced grocery-store pound cake, whipped cream, and overripe berries macerated with sugar and your favorite liqueur.

45

46. Make Store Bought Cake Icing Taste Better
Make store-bought cake frosting go twice as far: Whip the icing with your electric mixer and let air plump it up.

46

47. Make store-bought cake frosting go twice as far
Whip the icing with your electric mixer and let air plump it up.

200147228-001

48. Save a Scorched Pan
To save a scorched pan, sprinkle the burned bottom with baking soda, then add four to five tablespoons salt, plus enough water to cover, and let stand overnight. Scrape out charred remains with a rubber spatula.

48

49. Keep Copper Polished
Use ketchup to polish copper: Just apply a thin coat of the condiment, and rub off with a clean rag.

49


Cheesy Spaghetti

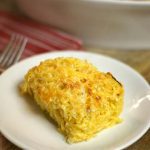
Cooked spaghetti squash has a surprisingly similar texture to hash browns, and blends seamlessly into this simple casserole, with a lower starch content. Combined with sauteed onions, probiotic-rich yogurt, and a bit of raw goat cheddar, this creamy dish is classic comfort food–> without leaving you feeling uncomfortable later.

Ingredients
1 medium spaghetti squash
1 tablespoon butter
1/2 yellow onion, chopped
1 garlic clove, minced
1 cup plain goat’s milk yogurt, or greek yogurt
3 oz. raw goat cheddar, shredded and divided
1 teaspoon sea salt, or to taste
black pepper, to taste

Directions
Preheat the oven to 400F and line a baking sheet with a Silpat or parchment paper. Cut the spaghetti squash in half, and remove the seeds. Place the squash halves cut-side-down on the baking sheet, and cook for 35-45 minutes, or until a fork can easily pierce the outer shell. (For full directions, see this post.)

Once you have removed the squash from the oven, melt the butter in a skillet over medium-high heat and saute the chopped onion and garlic until tender and slightly golden, about 5 minutes.

cheesy3

Transfer the cooked onion and garlic to a large mixing bowl, and combine with the yogurt and 2 oz. of shredded goat cheddar, then season with salt and pepper. When the spaghetti squash is cool enough to handle, use a fork to scrape the noodle-like strands into the bowl, and mix well.

Transfer the mixture to a 2.5-quart casserole dish, and smooth the top with a spatula. Sprinkle the remaining ounce of goat cheddar over the top, and return to the oven to bake for 30 minutes at 400F.

The casserole is ready when the top is a light golden brown, which makes for a crunchy crust! Serve immediately.

cheesy4


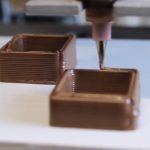
A 3D Chocolate Printer Is Coming To Hersheypark

3D Chocolate Printer

For a while now, scientists have been taunting us with 3D printers that seem to exist solely at tech trade shows or in space. Hershey’s is aiming to change that this May by installing a 3D chocolate printer in their Pennsylvania HQ, which will even let you print choco versions of your face.

As Ad Age reports, the aptly-named CocoJet was briefly showcased at Hershey’s Chocolate World in December and made a splash at CES in Vegas this month. But Hershey’s is moving to install a permanent CocoJet exhibit at Chocolate World (which shares a campus with Hersheypark and the Hershey Museum) in May — and this thing won’t just be there to look pretty. Visitors will be able to order custom treats off the thing, from tasty geometric shapes to wedding toppers. Or, if you’re a candy history geek, Milton Hershey’s visage:

Though the candy company wouldn’t go into detail, Hershey’s believes there might be other fun uses for the CocoJet in the future. We’re personally holding out hope for a printed chocolate T-Rex stuffed with Reese’s peanut butter, but leave your fantasy print jobs in the comments.


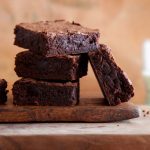
The Most Perfect Dark Chocolate Brownies Ever

Brown-Cocoa-Brownies

Ingredients
250 grams bittersweet chocolate chips
3 large eggs
1 1/4 cups (175 grams) granulated maple sugar
3/4 cup (187 milliliters) canola oil
1 1/2 teaspoons vanilla extract
6 tablespoons (50 grams) cassava flour
1/4 cup plus 2 tablespoons (37 grams) dark cocoa powder
3/4 teaspoon (3 grams) fleur de sel

Directions
1. Preheat the oven to 350° F. Cut a piece of parchment paper large enough to cover the bottom and sides of an 9-inch by 13-inch by 1-inch rectangular baking pan (also called a quarter-sheet pan). Grease one side of the parchment with a nonstick cooking spray (I use a spray grapeseed oil), and fit it (ungreased side down) into the pan.

2. Add the chocolate to a medium, microwave-safe bowl. Cook on high power in the microwave in 30-second intervals, stirring in between each cycle, until the chocolate is melted. Be careful not to burn the chocolate. Set aside to cool slightly.

3. Add the eggs and sugar to a clean, large bowl. Whisk until they become thick and pale yellow, 1 to 2 minutes. Whisk in the melted chocolate. Add the oil and the vanilla extract; whisk to combine.

4. Sprinkle the flour, cocoa, and salt on top. Fold the mixture using a rubber spatula, just until there are no visible traces of flour.

5. Pour the batter into the prepared pan, spreading it evenly to the sides. You can give the pan a tap on the counter to help it settle, too. Bake for 40 to 45 minutes, until the center is set and the edges gently pull slightly away from the sides of the pan. Let cool completely (at least two hours) before cutting into thirty 2-inch squares.


Mars Bar Muffins

Everybody loves muffins. This is the best and the easiest muffin recipe ever.

1. Preheat oven to moderate, 180°C. Lightly grease a 6-hole texas muffin pan.

2. Combine butter and sugar in a medium saucepan. Stir over a medium heat for 1-2 minutes until melted. Remove from heat. Add 2 1/2 mars bars and cocoa, stirring until well blended. Cool slightly.

3. Whisk in eggs, followed by flour, almond and vanilla, until combined.

4. Divide mixture evenly into prepared pan. Top each with remaining mars bar.

5. Bake for 20-25 minutes until centre is just firm. Cool in pan for 10 minutes before transferring to a wire rack.

6. Drizzle cakes with melted chocolate and serve warm with double cream and berries.

7. Enjoy. 🙂


The Right Way To Make A Fried Egg

INGREDIENTS
½ tablespoon butter or canola oil
1 egg
Salt and freshly ground pepper

Knowing how to make a fried egg is an essential skill in cooking. Many cooking experts say they can evaluate a chef simply by the way they cook eggs. If you’ve watched enough cooking competition shows, then you’ve surely seen a episodes focused on egg cookery: from omelettes to poached eggs.

A simple fried egg is one of the easiest ways to cook an egg, but mastery of this basic skill adds an important tool to your belt because so many dishes can be transformed from a side dish into a full-fledged meal just with the addition of an egg on top.

Directions for a sunny side up egg or an over-easy egg are both below, so pick your preference. If you’re not clear on the difference, a sunny side up eggs is only cooked on one side, while an over-easy egg is cooked on both sides (and can be made “over-medium” or “over-hard” by cooking it longer). Some people think sunny-side up eggs are prettier, while others prefer the flavor when both sides are cooked in fat.

fried egg_2

PREPARATION
1. In a nonstick small pan, warm butter or canola oil over high heat. Crack the egg into the middle of the pan and season with salt and pepper.

2. For a sunny side up egg, place a lid on top of pan and cook 2 to 3 minutes until the egg white is set and the edges of fried egg are golden brown. For an over-easy egg, cook about 2 minutes until the egg whites are mostly set. Use a spatula to flip the egg over.

Cook about 30 seconds until whites are completely set; serve.


Easy Oven-Baked Chicken Fajitas

Make fajitas easier than ever with this oven shortcut that will save you time, but won’t skimp on flavor.

Ingredients
1 large onion
1 medium red bell pepper
1 lb boneless skinless chicken breasts
1 package (1 oz) Old El Paso™ fajita seasoning mix
2 tablespoons vegetable oil
Old El Paso™ tortillas for soft tacos & fajitas (6 inch; from 8.2-oz package)
Sour Cream
Old El Paso™ Thick ‘n Chunky salsa
Chopped fresh cilantro

Directions
1. Heat oven to 400°F. Spray 13×9-inch (3-quart) glass baking dish with cooking spray. Cut onion and bell pepper into even slices; place in baking dish.

2. Cut chicken breasts into thin strips; add to vegetables in dish. Sprinkle with seasoning mix; drizzle with oil. Stir until combined and pieces are coated.

3. Bake 35 to 40 minutes, stirring once halfway through baking, until chicken is no longer pink in center.

4. Spoon small amount of chicken and veggies onto each tortilla. Top each with sour cream, salsa and cilantro, or your favorite fajita toppings.


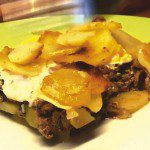
Potato moussaka

Potato moussaka

Probably not at all authentic, but this is a family favourite, and there’s tons of leftovers for lunches or an easy reheat meal during the week. This recipe has a layer of potato which is the way I usually make it, but it would of course be lovely with just the meat and eggplant layers.

INGREDIENTS
5-6 pounds of potatoes, peeled, cut in 1/2 inch slices
2 tablespoons of oil
1 medium onions, chopped
2 1/2 pounds of ground beef (or lamb)
sea salt (to taste)
freshly ground black pepper
1/2 teaspoon of ground allspice

PREPARATION


Spicy Roasted Brussels Sprouts

brussels_sprouts

Brussels sprouts have made a comeback. And if they’re good enough to serve at restaurants across the country, then they’re good enough to serve at dinner tonight. You just need the right recipe, and we’re here to help. In our version, we toss the sprouts with sweet honey and spicy hot sauce and roast them until caramelized. You’ll be devouring spicy roasted Brussels sprouts all winter long.

INGREDIENTS
1½ pounds brussels sprouts
½ cup extra-virgin olive oil
¼ cup rice-wine vinegar
¼ cup honey
2 tablespoons Sriracha, or more to taste
Kosher salt and freshly ground black pepper

DIRECTIONS
Preheat the oven to 400°F. Trim the base away from the brussels sprouts and discard. Cut the sprouts in half.
In a large bowl, whisk the olive oil with the vinegar, honey and Sriracha to combine. Add the brussels sprouts and toss until they are fully coated. Season with salt and pepper to taste.
Spread the brussels sprouts on a baking sheet, cut sides down. Pour any extra olive-oil mixture onto the pan and tilt the pan around to distribute it.
Roast until the sprouts are crispy on the outside and golden and caramelized on the cut sides, 20 to 30 minutes. Serve immediately.


This guy has tracked every meal he’s eaten for the last 4 years

Jamie Welsted is just a normal guy — except that he has diligently tracked every meal (and beverage) that he’s consumed over the past four years. But make no mistake: This is not Weight Watchers.
The 41-year-old graphic designer from Buffalo, New York, started the project when his coworkers were confused about how much food he was able to eat without seeming to gain any weight. “I’ve been blessed with a fast metabolism,” Welsted told Business Insider. “I’m a skinny guy — I eat whatever I want.”

So he started chronicling his daily intake, including the location, dishes, and cost of each of his meals and beverages. Originally just a simple Google Doc, the project quickly morphed into a Tumblr page that he updates each day, and sometimes even on the go; it takes him about 30 minutes to an hour. Over the years, he’s collected over 5,500 followers of his culinary journey, along with an impressive data log of his (highly) caloric intake and expenses. He calls his blog “My Terrible Diet.” We talked to him to see what he’s learned from the project.

“I really love eating, and I love food,” Welsted said. He eats at restaurants “about 98% of the time.” His first foray into documenting his eating was a “Tour de Sub” of a local sub-sandwich shop. He tried all 34 options on the menu.

1

Then he turned to daily diet-tracking. Because of his habit of eating out — and eating a lot — Welsted’s diet isn’t for the cost-conscious, or those trying to slim down. Here’s a look at a random week in his food diary.

3

“One of the most remarkable things is that this is the single most expensive thing I do in my life — more expensive than my house mortgage, insurance, car,” Welsted said.

4

In 2015, he spent $12,271.63 on food and drink alone. “I learned that I spend an awful lot of money on food,” he said. “If I needed to save, this is what I’d save on.” He spent even more — $16,115.61 — in 2014, because he started eating more “interesting” meals for the blog, and getting into steak.

5

“I eat much less fast food than I used to,” Welsted told us. It seems the decision was made more out of a lack of convenience (his local Burger King closed down) than out of an interest in better health. He’s stayed pretty much the same weight over the years.

6

He’s not much of a cook, so he was happy when a coworker introduced him to Soylent, the meal-replacement beverage that’s popular among engineers in Silicon Valley. It makes for an easy dinner on nights when he doesn’t go out.

7

Since he eats so much, he often will skip a meal or two — what he calls a “food sabbatical.” And no, he doesn’t exercise. He was supposed to start a beginner-yoga course in early April, but the class was canceled. “Maybe it’s a sign,” he said.

8

Whether it’s a cocktail or a burger, Welsted is consistently honest on the blog. It’s one of the most detailed food diaries we’ve ever come across, and an easy place to waste an afternoon as a voyeur into someone else’s eating habits.

9

He’s planning on keeping up with the blog — it’s a routine he appreciates. It’s even created an online community, with people checking in regularly when they’re concerned he’s not eating enough. “Not everything’s bad out there in the world,” he says about the feedback he’s received.